

Varnish is wicked! It works on your webserver as a reverse proxy to cache HTTP requests. According to their website:
Varnish Cache is really, really fast. It typically speeds up delivery with a factor of 300 - 1000x, depending on your architecture
I have only just installed it on this very website, and have already seen an improvement of about 500 times without actually having to do much. I spent about 2 hours to configure it all, but could probably attribute 1 hour to this to dumbness on my side while trying to get it all configured.
I have now come up with a configuration that works perfectly (so far) on this website, and have used a mix and match of resources such as this and this. They are both great, but I found that they didn’t particularly cater for what I was looking for as I have very particular needs.
In my VPS, I have a few domains running, but only really wanted to have this website cached, since the other domains either get their content updated too often, or get too few hits to actually justify caching.
I also didn’t want to cache any of my sub-domains, as most of them are actually running on the cloud and being proxied by Apache via mod_rewrite. It turns out those didn’t really wanna play when the HTTP requests were cached, and because they are mostly dynamic applications, I didn’t think it was worth spending time and energy configuring them to get the cache purged.
Installing Varnish
Start by making sure you have all the necessary stuff to install it. You will have to do this in your terminal either by logging in to your server or SSH’ing to it.
sudo yum install gcc make automake autoconf libtool ncurses-devel libxslt groff pcre-devel pckgconfig libedit libedit-devel
We now install Varnish. At the moment, the latest stable version of Varnish is 3.0.4, and I’m currently only interested in stable versions, but because I want this post to be timeless, I will give you the Installation on RedHat link which will always give you latest version.
Grab the link that corresponds to your Centos version (5 or 6) and paste it in your terminal
rpm --nosignature -i http://repo.varnish-cache.org/redhat/varnish-3.0/el6/noarch/varnish-release/varnish-release-3.0-1.el6.noarch.rpm
Now all that is left to install Varnish is to run
sudo yum install varnish
We want Varnish to run every time we restart our server, and we want it to run automatically, so let’s add it in
chkconfig --level 345 varnish on
Being able to listen to connections
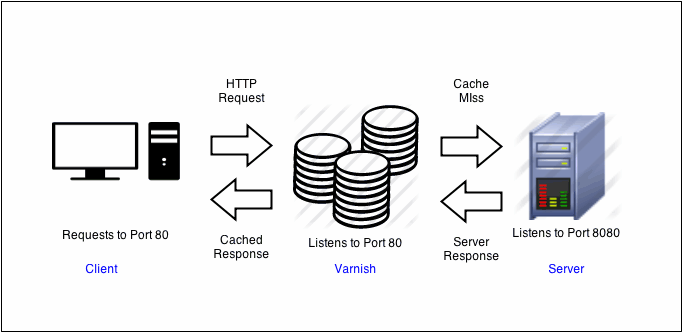
You are probably running your website through port 80 (which is the most often used port by HTTP). that is fine, and you obviously already have it running fine. But because we will be running Varnish before our webserver, we will also need to use another port, which means we need to make sure that port also accepts TCP connections. We will be using port 8080 here, which is fine if you’re not running tomcat (it normally defaults to this port), but you can use any other port you want really, as long as it’s not already in use by anything else. We will end up with the following architecture:
To be able to use this port, we need to make sure our firewall actually allows that port to receive HTTP connections. luckily I have already written an article about this, so give it a read to understand a little better why we’re doing this. a <abbr title=’Too long; Didn’t read’ rel=’tooltip’>tl;dr</abbr> version of it would be as such:
sudo vim /etc/sysconfig/iptables
Find where port 80 is being opened, and add a new line under it with the following:
-A INPUT -p tcp -m tcp --dport 8080 -j Accept
Restart iptables
sudo service iptables restart
Configuring Varnish
Once you have installed Varnish, it will create a file under /etc/sysconfig/varnish. This file contains 4 alternatives of pre-configured settings for Varnish. It’s very good to get you going, but you will probably find there will be things you’re going to want to change. I have used “Alternative 2” as I found it to be the one that suits me the most. Feel free to read through all the other alternatives though, and choose the one that takes your fancy. Make sure you comment the other alternatives out so you end up with only one.
One thing you should definitely do, is set how much memory you will allow Varnish to take up. Depending on how much memory you have on your server, you will want to configure it accordingly.
Varnish Options
I have configured mine as follows:
DAEMON_OPTS="-a :80 \
-T localhost:6082 \
-f /etc/varnish/default.vcl \
-u varnish -g varnish \
-S /etc/varnish/secret \
-s file,/var/lib/varnish/varnish_storage.bin,256m"
On the first line, I’m telling Varnish to listen to port 80, and on the last line I’m specifying how much memory I want Varnish to take up. 256mb is quite a lot to be honest, but you can allow more in case you have some to spare.
The VCL Configuration
Put it this way… you configure your websites here, so you will want to pay some attention to this file. Getting it wrong will give you a lot of grief, and likely to take your website down for a few minutes until you get whatever you got wrong right. The configuration you will see here is my suggested configuration, and again, is an amalgam of a few configurations I found plus a few extra things I wanted to add myself.
backend default {
  .host = "127.0.0.1";
  .port = "8080";
  .connect_timeout = 600s;
  .first_byte_timeout = 600s;
  .between_bytes_timeout = 600s;
  .max_connections = 800;
}

sub vcl_recv {

  # all domains in here will return a "pass" which means they won't be cached
  if (req.http.host ~ "(www\.)?(site1.com|site2.co.uk|site3.me)") {
    return (pass);
  }

  # all sub-domains listed here will also return a pass, so no caching either
  else if(req.http.host ~ "(ads|cfaday|cffunctionaday|cftagaday|wallpapers|examples|coinconverter|langithub|top40)(\.placona.co.uk)"){
    return (pass);
  }
  # now this is cached
  else if(req.http.host == "placona.co.uk"){
    set req.backend = default;
  }
  else {
    set req.backend = default;
  }

  remove req.http.X-Forwarded-For;
  set req.http.X-Forwarded-For = client.ip;
  set req.http.Cookie = regsuball(req.http.Cookie, "(^|;\s*)(_[_a-z]+|has_js)=[^;]*", "");
  set req.http.Cookie = regsub(req.http.Cookie, "^;\s*", "");
  if( req.url ~ "^/wp-(login|admin)" || req.http.Cookie ~ "wordpress_logged_in_" ){
    return (pass);
  }
  if (req.request == "PURGE") {
    return (lookup);
  }
  if (req.url ~ "^/phpmyadmin") {
    return (pass);
  }
  if( req.url ~ "\?s=" ){
    return (pass);
  }
  if ( req.request == "POST" || req.http.Authorization ) {
    return (pass);
  }
  unset req.http.Cookie;
  return (lookup);
}
#
# accept purges from w3tc and varnish http purge
sub vcl_hit {
  if (req.request == "PURGE") {
    purge;
  }
  return (deliver);
}
#
# accept purges from w3tc and varnish http purge
sub vcl_miss {
  if (req.request == "PURGE") {
    purge;
  }
  return (fetch);
}

#
#

sub vcl_fetch {
  # allow phpmyadmin
  if (req.url ~ "^/phpmyadmin") {
    return (hit_for_pass);
  }
  #
  # remove some headers we never want to see
  unset beresp.http.Server;
  unset beresp.http.X-Powered-By;
  #
  # only allow cookies to be set if we're in admin area - i.e. commenters stay logged out
  if( beresp.http.Set-Cookie && req.url !~ "^/wp-(login|admin)" ){
    unset beresp.http.Set-Cookie;
  }
  #

  # don't cache response to posted requests or those with basic auth
  if ( req.request == "POST" || req.http.Authorization ) {
    return (hit_for_pass);
  }
  #
  # only cache status ok
  if ( beresp.status != 200 ) {
    return (hit_for_pass);
  }
  #
  # don't cache search results
  if( req.url ~ "\?s=" ){
    return (hit_for_pass);
  }
  #

  # else ok to cache the response
  set beresp.ttl = 24h;
  return (deliver);
}
#
#

sub vcl_deliver {
  # add debugging headers, so we can see what's cached
  if (obj.hits > 0) {
    set resp.http.X-Cache = "HIT";
  }
  else {
    set resp.http.X-Cache = "MISS";
  }
  # remove some headers added by varnish
  unset resp.http.Via;
  unset resp.http.X-Varnish;
  remove resp.http.Age;
  remove resp.http.X-Powered-By;
  remove resp.http.X-CF-Powered-By;
}
#

sub vcl_hash {
  hash_data( req.url );
  # ensure separate cache for mobile clients (WPTouch workaround)
  if( req.http.User-Agent ~ "(iPod|iPhone|incognito|webmate|dream|CUPCAKE|WebOS|blackberry9\d\d\d)" ){
  hash_data("touch");
  }
  return (hash);
}
A few important things here happen in the very beginning of the file. I will repeat it down here to be able to explain it better:
backend default {
  .host = "127.0.0.1";
  .port = "8080";
  .connect_timeout = 600s;
  .first_byte_timeout = 600s;
  .between_bytes_timeout = 600s;
  .max_connections = 800;
}
We are telling Varnish our host IP address is localhost, so it should proxy requests to it, and am also telling it to proxy them through port 8080. If you have chosen a different port, this is where you should change it to that port.
On sub vcl_recv we then specify which domains we don’t want to cache by returning “pass”. This according to the documentation defines:
When you return pass the request and subsequent response will be passed to and from the backend server. It won’t be cached. pass can be returned from vcl_recv
# all domains in here will return a "pass" which means they won't be cached
if (req.http.host ~ "(www\.)?(site1.com|site2.co.uk|site3.me)") {
  return (pass);
}

# all sub-domains listed here will also return a pass, so no caching either
else if(req.http.host ~ "(ads|cfaday|cffunctionaday|cftagaday|wallpapers|examples|coinconverter|langithub|top40)(\.placona.co.uk)"){
  return (pass);
}
So we are skipping Varnish here and doing our own thing, which in this case is exactly what we want to do.
We then move on by telling Varnish what we actually want to cache
# now this is cached
else if(req.http.host == "placona.co.uk"){
  set req.backend = default;
}
Bonus Varnish trick
Great, if you have made all your changes, but somehow messed up, Varnish is likely to not even start, but if it does, it will cause you a lot of heartache, so what you should do, is check that your configuration is correct. you can do so by running:
varnishd -C -f /etc/varnish/default.vcl
And if everything is OK, you should see that your configuration got compiled correctly and nothing like “Running VCC-compiler failed, exit 1” was returned. If it does, you will then need to go back to your file and edit it. The compiler is pretty OK though and will tell you in which line the error happened.
Configuring Apache
If you’re still with me, you’re just a few moments away from being pretty pleased with your new setup, but bear with me for another moment as we still need to make a couple of changes in Apache.
Remember back in the last image where we discussed Apache would now listen to port 8080? Well there we go, it’s time to change this.
Let’s open our Apache configuration file by running the following:
sudo vim /etc/httpd/conf/httpd.conf
We will then change
Listen 80
NameVirtualHost *:80
To be
Listen 8080
NameVirtualHost *:8080
This is now effectively telling Apache to listen to port 8080, which in our case is the port Varnish will be communicating with.
Configuring Virtual Hosts
This step can be considered optional, as not everyone uses virtual hosts. I use quite a few of them, so in my case, I had to go to each and every virtual host and also modify them to listen to port 8080 as opposed to 80. You would do this as follows:
<VirtualHost *:8080>
DocumentRoot /var/www/awesome
ServerName awesome.placona.co.uk
ServerAlias awesome.placona.co.uk
</VirtualHost>
Bonus Apache trick
Wanna check your Apache configurations are all working before you go on restarting it? Just run:
/usr/sbin/httpd -t
If you get “Syntax OK” you’re laughing!
Guess what?
Your website is just about to be faster than about 70% of the web. which is absolutely incredible if you consider the amount of time we spent together getting this done.
But we need to turn it on…
sudo service varnish start
sudo service httpd restart
Bonus browser trick
Check that your content is really being cached by opening an incognito window (or private browsing if you’re in Firefox) and press the F12. this should show your developer toolbar (or firebug).
Now click on the Network tab (or Net tab) and expand the first GET request (this should be the same as the URL of your website). Also pay attention to how long this item took to complete.
Look in request headers, and if this is the first request to that page you should see something like:
HTTP/1.1 200 OK
Vary: Accept-Encoding,Cookie
X-Pingback: http://www.placona.co.uk/xmlrpc.php
Content-Encoding: gzip
Expires: Thu, 15 Apr 2015 20:00:00 GMT
Content-Type: text/html; charset=UTF-8
Content-Length: 14529
Accept-Ranges: bytes
Date: Wed, 23 Apr 2014 08:17:33 GMT
Connection: keep-alive
X-Cache: MISS
If you’re seeing this, it means your cache is actually working, but because you’re the first one to hit this page, you’ve got a cache miss, which basically means Varnish still didn’t have that entry cached.
If you refresh the page, you should see two things here:
- Your page load is now much faster
- X-Cache now says HIT
Because you’re now caching your request, your page loads will be much faster in general. Obviously this won’t account for page loads on external resources, but you can use other methods to cache those resources (see my CDN post here).
Every subsequent request you make to that page will also come from cache. The more hits you get in different pages, the best results your users will get. Spiders also work in your favour here as by hitting pages, they are also warming up your cache for you.
But… IP’s…
That’s right, you have now noticed every new comment you get on your blog is coming from 127.0.0.1. Remember when we changed Apache to only listen to Varnish? We have also made every single request internal, which means everything now comes from localhost. There is a very simple plugin to correct this, which will resolve this by using the variable X-Forwarded-For to get the correct user’s IP. You can check it out here.
Final thoughts
I am super happy with Varnish installed on my server, I have already seen a real benefit on my server’s performance, and the CPU is pretty much always running at about 25%, which is really good considering my traffic. Memory is always running slightly above it would have been before, but that is mainly because I’m now effectively using it, instead of just throwing stuff at it and leaving it to be disposed.
I have also installed a plugin called Varnish HTTP Purge, which manages my cache, and clears it every time I post a new entry. it also allows me to purge my cache manually, or control some other things such as which kind of requests to cache. you can find it here.
Make sure you benchmark your requests and report back on how much of improvement Varnish has made into your webserver.
