Recording videos in Android used to be a very involved task where it was necessary to write a lot of boilerplate code to initialise the camera and then keep control of the video state and its metadata.
With the introduction of CameraX to Android Jetpack, it only takes a few lines of code to get that going. Let’s build a video recording application.
Setup
You can download the code for this project in this repository if you just want to see it running and not follow along.
In Android Studio create a new project with an empty activity.

On the next screen give your project a name, I called mine Droidagram and made sure to check the Use androidx.* artifacts. I will be using Kotlin here, but you should feel free to use Java if you like typing more code.

Open up your AndroidManifest.xml and add the following just before the <application tag.
<uses-permission android:name="android.permission.CAMERA" />
<uses-permission android:name="android.permission.RECORD_AUDIO" />
This makes sure that we request the correct permissions to open up the camera and record audio on the device.
Open your module level build.gradle and add the following dependencies and sync:
def camerax_version = "1.0.0-alpha01"
implementation "androidx.camera:camera-core:${camerax_version}"
implementation "androidx.camera:camera-camera2:${camerax_version}"
At the time of writing “1.0.0-alpha01” is the latest version of CameraX, so make sure you check here for a more up-to-date version, though keep in mind that it may break the code you see here.
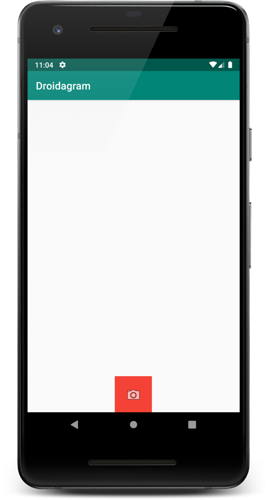
Open activity_main.xml and on the XML view add a TextureView and an ImageButton instead of the existing TextView
<TextureView
            android:id="@+id/view_finder"
            android:layout_width="0dp"
            android:layout_height="0dp"
            app:layout_constraintTop_toTopOf="parent"
            app:layout_constraintBottom_toBottomOf="parent"
            app:layout_constraintStart_toStartOf="parent"
            app:layout_constraintEnd_toEndOf="parent" />

    <ImageButton
            android:layout_width="72dp"
            android:layout_height="72dp" app:srcCompat="@android:drawable/ic_menu_camera"
            android:id="@+id/capture_button" android:layout_marginBottom="24dp"
            app:layout_constraintBottom_toBottomOf="parent"
            app:layout_constraintEnd_toEndOf="parent" android:layout_marginEnd="8dp"
            app:layout_constraintStart_toStartOf="parent" android:layout_marginStart="8dp"
            android:layout_marginTop="8dp" app:layout_constraintTop_toBottomOf="@+id/view_finder"
            app:layout_constraintHorizontal_bias="0.498" app:layout_constraintVertical_bias="0.748"
            android:background="#F44336"/>
If you run this application now you will see something similar to this:
Adding the camera preview
To be able to preview the camera, we need to request the permissions first. We do that going to MainActivity.kt and adding a couple of constants just before our class.
private const val REQUEST_CODE_PERMISSIONS = 10
private val REQUIRED_PERMISSIONS = arrayOf(Manifest.permission.CAMERA, Manifest.permission.RECORD_AUDIO)
private val tag = MainActivity::class.java.simpleName
The number 10 here is just an arbitrary number we are using to keep track of the permission, and then we have an array with our required permissions which matches what we’ve added to our manifest earlier. Just make sure you import Manifest from import android.Manifest.
Now let’s change this class so it also implements LifecycleOwner as we will need to bind our camera to it later.
class MainActivity : AppCompatActivity(), LifecycleOwner {
Inside the class, and before onCreate add the following lateinit variables.
private lateinit var viewFinder: TextureView
private lateinit var captureButton: ImageButton
private lateinit var videoCapture: VideoCapture
Inside onCreate and just after setContentView add the following lines of code to start requesting permissions when this activity starts:
viewFinder = findViewById(R.id.view_finder)
captureButton = findViewById(R.id.capture_button)

// Request camera permissions
if (allPermissionsGranted()) {
    viewFinder.post { startCamera() }
} else {
    ActivityCompat.requestPermissions(
        this, REQUIRED_PERMISSIONS, REQUEST_CODE_PERMISSIONS)
}
Notice that both allPermissionsGranted and startCamera are be showing in red on the IDE.
At the bottom of the class, just after onCreate, add the following three methods, and the error warnings disappear:
override fun onRequestPermissionsResult(
    requestCode: Int, permissions: Array<String>, grantResults: IntArray) {
    if (requestCode == REQUEST_CODE_PERMISSIONS) {
        if (allPermissionsGranted()) {
            viewFinder.post { startCamera() }
        } else {
            Toast.makeText(this,
                "Permissions not granted by the user.",
                Toast.LENGTH_SHORT).show()
            finish()
        }
    }
}

private fun allPermissionsGranted(): Boolean {
    for (permission in REQUIRED_PERMISSIONS) {
        if (ContextCompat.checkSelfPermission(
                this, permission) != PackageManager.PERMISSION_GRANTED) {
            return false
        }
    }
    return true
}

private fun startCamera() {
    TODO("not implemented") //To change body of created functions use File | Settings | File Templates.
}
The first and second methods handle the permission request and the response once the user decides as to whether they accept that we can use the camera within our app. Make sure that if you run the application now, you say “allow” to both.
Lastly, we’re going to add some code to display the camera preview on the screen for when we run the app.
Remove the TODO code from the startCamera method and add the following:
// Create configuration object for the viewfinder use case
val previewConfig = PreviewConfig.Builder().build()
// Build the viewfinder use case
val preview = Preview(previewConfig)

preview.setOnPreviewOutputUpdateListener {
    viewFinder.surfaceTexture = it.surfaceTexture
}

// Bind use cases to lifecycle
CameraX.bindToLifecycle(this, preview)
The code above is all you need to preview the camera. If you run the application now, it turns the camera on for your device or emulator. Now is a good time to try this out and see if everything is configured correctly.
Programming the button
I wanted this button to only record when I held it pressed, and for it to stop recording when released. Let’s add this logic inside the onCreate just before the end of the method.
captureButton.setOnTouchListener { _, event ->
    if (event.action == MotionEvent.ACTION_DOWN) {
        captureButton.setBackgroundColor(Color.GREEN)

    } else if (event.action == MotionEvent.ACTION_UP) {
        captureButton.setBackgroundColor(Color.RED)
    }
    false
}
Holding the button changes the background colour of it, and releasing brings it back to its original colour.
Recording videos
Now we’re ready to record our videos. Just before the logic for the button, add the following variable, so we get a location and a file name to save our recording.
val file = File(externalMediaDirs.first(),
            "${System.currentTimeMillis()}.mp4")
Now we just need to change our button so when pressed, it also starts recording, and when released it stops the recording.
captureButton.setOnTouchListener { _, event ->
    if (event.action == MotionEvent.ACTION_DOWN) {
        captureButton.setBackgroundColor(Color.GREEN)
        videoCapture.startRecording(file, object: VideoCapture.OnVideoSavedListener{
        override fun onVideoSaved(file: File?) {
            Log.i(tag, "Video File : $file")
        }
        override fun onError(useCaseError: VideoCapture.UseCaseError?, message: String?, cause: Throwable?) {
            Log.i(tag, "Video Error: $message")
        }
    })

    } else if (event.action == MotionEvent.ACTION_UP) {
        captureButton.setBackgroundColor(Color.RED)
        videoCapture.stopRecording()
        Log.i(tag, "Video File stopped")
    }
    false
}
If you are running CameraX version 1.0.0-alpha01 you will notice a red squiggly line under the startRecording and stopRecording methods. This is because this functionality is still highly experimental and likely to change and is still restricted.

You can tell the compiler to ignore those by adding the following to the top of this class:
@SuppressLint("RestrictedApi")
class MainActivity : AppCompatActivity(), LifecycleOwner {
The last thing we need to do is initialise the video recorder use-case, so when the camera is started, we tell it to get ready for some recording action. Head to the startCamera method and just after val preview = ... add the following:
// Create a configuration object for the video use case
val videoCaptureConfig = VideoCaptureConfig.Builder().apply {
    setTargetRotation(viewFinder.display.rotation)
}.build()
videoCapture = VideoCapture(videoCaptureConfig)
This creates a new configuration for the video capturing use-case and initialises the last uninitialised lateinit variable we had, which is called videoCapture. Let’s also bind this to the lifecycle by changing it to this:
// Bind use cases to lifecycle
CameraX.bindToLifecycle(this, preview, videoCapture)
Run the application and hold the record button, and your video will get saved to the filesystem as soon as you release it. You can check your recording out by going to /storage/emulated/0/Android/media/[your.package.name].
So this is all it takes to use this great new addition to JetPack. Get recording and let me know what you think by hitting me up @marcos_placona.